Friday 27 December 2013

LOOK YOUNGER & FIGHT WRINKLES

To fight wrinkles and other signs of aging, you need to keep your skin protected and hydrated. Though you can't turn back hands of time, these anti-aging skincare tips will help keep your skin smoother and younger looking.

EAT FOR SKIN HEALTH

What we eat has a huge impact on how we look, especially when it comes to achieving that much-coveted youthful glow. Sports dietitian Marie Spano, MS, RD, CSCS, CSSD, recommends getting plenty of what she calls "smart" fats - omega-3s and monounsaturated fat - which help regenerate skin at the cellular level, improve texture and tone and help ensure skin looks supple. Get these smart fats from fatty fish (salmon, mackerel, herring, halibut, sardines), avocado, olives and olive oil.    
Spano also suggests choosing foods rich in lutein - a carotenoid that may help protect your skin from the inside out. The best sources of lutein are egg yolks, leafy dark green veggies and fresh corn. Some studies have found that lutein may also protect skin from UV damage.  
Foods that are high in antioxidants, such as berries, broccoli, leafy greens (kale, spinach) and tomatoes are also great for your skin. We need antioxidants to help protect the skin from free-radical damage (rough texture, wrinkles, sun spots). Vitamin E is another must for skin health, Spano says, and suggests adding vegetable oils, wheat germ, nuts, seeds and olives to your diet for healthy, glowing skin.

STAY HYDRATED

If you want skin to look younger and more supple, drinking enough water is a must. "Dehydrated skin looks wrinkled and rough," Spano says. Aim for eight glasses of a day, which will also help you lose weight, aid digestion, improve your energy and concentration and flush toxins from your body. Keep a reusable bottle in your purse for easy, on-the-go sipping. 

ANTI-AGING SKIN CARE

Cleanse: Gently wash your face both morning and night, but steer clear of cleansers that have high alcohol content and other drying agents. Try DERMAdoctor Wrinkle Revenge 1 ($24), which leaves skin clean, soft and free of pore-clogging debris.
Exfoliate: Exfoliate your skin weekly with a gentle facial scrub, which will get rid of dead skin cells and keep skin smooth, healthy and fresh. Try Dermalogica Daily Microfoliant ($50), a gentle but effective product that stimulates cell renewal and brightens skin.
Moisturize: Apply moisturizer over your entire face and neck twice a day. Dry, aging skin loses its elasticity, which is when wrinkles start to form. Try SkinMedica Rejuvinative Moisturizer ($54), which strengthens skins' moisture barrier to improve the look of dry, aging skin.

WHAT TO SHOP FOR

Look for skincare products with effective anti-aging ingredients such as vitamins A, C and E, retinol, peptides, alpha hydroxy acids (AHAs) and glycolic acid. Most major skincare brands offer products with these anti-aging ingredients, and these products will help reduce the appearance of fine line and wrinkles, as well as help slow the aging process. 

 Best anti-aging products for every budget.

PROTECT YOUR SKIN

No matter your age, you need to protect your skin from the sun. Not only can sun exposure lead to skin cancer, it will also cause dryness, sun spots, wrinkles and other visible signs of aging. Always use a moisturizer, sunscreen and cosmetics that contain SPF 15 or higher. If you spend a lot of time in the sun each day, wear both sunglasses and a hat.

HOMEMADE SKIN CARE

Even though you can buy anti-aging products at the store, you can also go the DIY route and make your own. We've created a simple but effective recipe you can try at home using items you probably have in your kitchen.

APPLE ANTI-AGING CREAM

Ingredients:
  • 2 tsp apple juice
  • 1 tsp lemon juice
  • 2 Tbsp buttermilk
  • 1 Tbsp rosemary oil
  • 3 seedless grapes
  • 1/2 apple
  • 2 egg whites
Directions: 
  1. Blend all the ingredients in a food processor or blender.
  2. Use a cotton ball and dab the mixture over entire face.
  3. Pay special attention to areas around the mouth and eyes.
  4. Allow mixture to dry completely and then rinse with cool water.
  5. Use twice a week for best results.
  6. Refrigerate leftover mixture for up to one week.

MORE ANTI-AGING SKIN CARE

Aging Skin Makeup Solutions

There is no age limit on beauty. Every season of life, however, brings challenges and changes. One of those opportunities is to revisit and reinvent your look. 
When it comes to makeup, don't settle for what worked for you decades ago. Open yourself up to a new approach that fits who you are now.

Hiding Fine Lines and Wrinkles

Some women mistakenly draw attention to the fine lines and wrinkles around their eyes by overdoing the area with makeup. Wrinkles become more noticeable as the makeup settles and cakes into lines.
Prevention begins with a moisturizer. Celebrity hairstylist Billy Lowe, beauty expert for television shows such as Extreme Makeover and TLC's 10 Years Younger, says, "After you wash your face in the morning, apply moisturizer while the skin is damp. That will plump it up and even it out, helping makeup glide on."
Don't forget to moisturize around your eyes. "Start with a silicone-based eye serum that will gel to the concealer and prevent it from slipping," Lowe says. "Packing on the makeup to cover lines or dark circles will bring out the creases." Avoid using heavy concealers that will look cakey around the eyes.
Makeup instructor Bridget Winton says to learn the bone structure and features of your face. "Focus on your bone structure to lift the face," she says. "Give yourself a youthful look by using lighter and darker shades to make hard lines soft and soft lines hard."
For example, work with a foundation that is one or two shades darker than your foundation to “lift” a sagging chin. Cover the darker area with a translucent powder.

How to Brighten Aging Skin

If your skin looks dull, use warm colors to brighten up. Experts suggest using a foundation that is a half-shade lighter than your skin tone.
To dim dark circles under your eyes, apply foundation that's a shade lighter than your foundation to the area. Top it with a concealer and then add a loose powder to set the makeup and hide the color difference.
Illuminators and bronzers can also add a sun-kissed glow. But don't overdo it; a bad fake tan can make you look older. Get a more natural glow by blending the bronzer into your moisturizer or foundation and then applying it evenly to your face. A loose powder just one or two shades darker than your skin tone can also add warmth.
Spritzers and moisturizing sprays help set makeup and give skin a dewy look, Winton says.
Apply moisturizer and sunscreens as a base each morning, and reapply sunscreen throughout the day. You Wash it all off every night and try a heavier, nighttime moisturizer.
"You know the saying, 'an ounce of prevention,'" Lowe says. "Take care of your skin at any age." 

5 Curly Hair Care Tips

5 Curly Hair Care Tips

Fun fact: My hair is actually naturally curly! Err.. well.. it was curly.. but it hasn't been the same since I had it chemically straightened back in January of 2011. BUT it's finally starting to be curly again. If you have curly hair.. here are some helpful pieces of advice:
1. Curly hair is naturally dry and thrives on moisture, which is why it's advantageous to use shampoos without sulfates, or try the "no-poo" method of eschewing shampoo altogether and just using conditioner.
2. Avoid using brushes and narrow-toothed combs, and instead opt for wide-toothed combs which cause less frizz and breakage.
3. The key to getting great curls is to set the curl pattern while your hair is damp. It's best to avoid completely combing through your hair. Instead set your part, then comb through as little hair as possible at the crown to have the hair lay as you want it.
4. Use a microfiber towel to dry your hair, but blot it dry instead of rubbing back and forth. This will cause less frizz! If you need your hair dried more quickly, use a blow dryer on a low/medium setting with a diffuser.
5. Also avoid touching your hair as much as possible.. this can separate your curls and lead to unwanted frizz.
Some Products to Try:
Redken Ringlet 07 Curl Perfector moisturizes and revives curls with "dramatic" definition while controlling frizz and adding shine.
TIGI Catwalk Curlesque Amplifier enhances your natural texture while defining curls and streamlining waves. Its essential oils combined with thermal and environmental protectants nurture curls for the perfect radiant finish.
DevaCurl Set It Free provides 24 hours of moisture. This moisture lock spray eliminates frizz, adds shine, and enhances curl
Fekkai Marine Summer Hair Beach Waves blends ocean botanical extracts, Australian sea kelp, and active cooling agents to create surf-sexy, tousled waves year round.
Ouidad Moisture Lock will define curls and make your hair shine.
Not Your Mother's Beach Babe Texturizing Sea Salt Spray adds sexy, tousled waves and a light matte finish to any hair type. Infused with natural dead sea salt and sea kelp, this salon formula has you and your hair ready for the boardwalk all year long.
Suave Professionals Captivating Curls Whipped Mousse is an alcohol-free mousse that has an anti-frizz complex and helps define and hold natural curl patterns for 24 hour touchable curls that are never crunchy.
What are your favorite products for curly hair? I swore by the Sunsilk Gel & Cream Twist, but Sunsilk products have been discontinued in the US.. and now they sell for like $30 a pop online. So I've been looking for my new "holy grail" curly hair products! Any suggestions would be greatly appreciated.

Top Curly Hair Tips You Can't Live Without

Curly hair does seem to have a mind of its own. But all it takes to love your waves, ringlets or kinky curls and make them look gorgeous is a few simple curly hair tips and tricks. None of them take much time or energy, but all of them promise that you’ll fall head over heels with your hair!

Feed your curls

Despite its larger than life presence, curly hair tends to be more fragile than other hair types and it’s definitely drier. Healthy fats likeomega-3 help make hair shiny and prevent a dry scalp. To hydrate from within, eat foods that contain these fats like avocados, ground flax seeds, flax seed oil, coconut oil, sardines, salmon, egg yolks and spinach.

Throw in the towel

A terry-cloth towel and your hair should never meet. “That’s because its harsh, bobbly fabric creates friction on curls that ruffle the cuticle of the hair and the result is frizz,” explains Lorraine Massey, co-owner of Devachan Salons and Spa and author of "Curly Girl: The Handbook." Plus, terry-cloth tends to soak up too much moisture and conditioner from the hair – something your curls need to stay frizz free and healthy. Good alternatives for blotting hair dry include an old, cotton t-shirt, burp cloth or a micro-fiber towel.

Rinse the right way

Conditioner is a curly girl’s best weapon against frizz since it provides the hydration your curls are thirsty for. Leaving some conditioner in the hair is also key — especially if you tend to get a dry, frizzy halo on top of your head. To rinse hair without sending all your conditioner down the drain, do what Massey calls a “trickle rinse.” “After cleansing and then conditioning, stand away from the shower stream and cup your hands together under the water."says Massey. "Then splash the water backwards over your hair a couple of times. This ensures that the top layer of hair, which tends to be very dry, can have the right amount of conditioner to keep it from being dry and, as a result, frizzing.”
  1. Type 2 (Wavy) Wavy hair can get flat at the crown area – especially if hair is long. Give this area lift with a few metal clips (duckbill clips). On wet hair, lift a small section of hair from the crown and hold it perpendicular to your scalp (rather than forward or back). Next, open the clip and slide it onto the hair so it’s close to the scalp. Do this on a few others sections of hair that tend to get flat and remove clips carefully (using two hands) when hair is completely dry. “Clipping the hair while it’s wet releases the hair from it's own weight during the drying process thus allowing it to dry with more body,” says Massey.
  2. Type 3 (Curly) You’ve probably noticed that the curls hidden at the nape of your neck tend to tangle and knot easily. “This is caused by the natural movement of your head throughout the day,” says Massey. After cleansing hair, apply a dollop of conditioner about the size of a quarter to the hair near the nape of your neck. Then, use your fingers to gently unsnarl knots and tangles. “Just be patient and gentle since the hair here breaks easily,” says Massey. “Remove knots from the hair with the same care you would a tangled necklace.”
  3. Type 4 (Kinky) This hair type is often extremely dense and tends to be dryer and thirstier for moisture. It will soak up as much conditioner as you will feed it, so be generous! A few nights a week, slather your dry hair with a deep conditioner starting at the ends and working it through your whole head. Then cover your pillow case with a towel and hit the sack. Talk about sleeping beauty! In the morning, you can rinse the conditioner out, though your hair may drink it up and you won’t need to. Decide then if you need a trickle rinse or not.

Hair Curling Tips- Curl Your Hair Like a Pro

If you’re someone with straight hair, you’re constantly thinking of new ways to style it. Layering your straight hair can help give it more volume, and so can volumizing shampoos and conditioners. Pulling your hair back into a ponytail or pulling it up in to a bun can be stylish.
If you’re looking to curl your hair, there are a few tips and tricks on how to make it look its boldest.
Even keeping your hair down can be a style wonder. Long locks of straight flowing hair when cleansed and conditioned can look marvelously natural, but if you’re getting bored of the same old thing and want to style your straight hair a different way, then there are numerous ways. One solution is to curl your hair.
When it comes to curling your hair, there are a number of different methods you can use, ranging from foam rollers, hot rollers, or curling irons. Curling your hair can add extra volume, body, and not to mention look stunningly beautiful. Practically everyone has tried curling their hair at some point to change up their look, but in order to successfully curl your hair there are a few tips to follow. Shine has some awesome tips on how you can curl your hair like a professional and get a bouncy and curly hairstyle that you can be proud of!

How to Curl Your Hair like a Pro

I have straight, fine, flat (aka boring) hair. My older, way cooler and prettier sister does not. She was blessed with big, voluminous curls that always look effortlessly bouncy. From the day I started watching her get ready in front of the mirror in high school — for yet another date with some football-playing dream machine — I envied every coil on her perfect head.
That’s when I started experimenting with the curling iron. I call it “experimenting” because after all these years, I still haven’t figured out how to perfectly curl my hair. Luckily, I got celebrity hairstylist Amita Moticka, director of cutting education for diPietro Todd salons and academy to finally give me tips on how to use a curling iron like a pro. Here’s what she spilled:

Curling tip 1: Choose the right sized iron

All curling irons were not created equal, so if you want to keep your hair healthy and achieve the look you’re after, you need to know what to look for in an iron. Here is a basic rundown:
First, size them up. The barrel size you choose should be based on the look you want to achieve. If you want to create loose curls or “beachy” waves, pick an iron that is one to two inches in diameter. If you want smaller, tighter ringlets, go for a .75 to one-inch thick iron, says Moticka.

Curling tip 2: Choose the right heat setting for your hair

Second, know how hot to go. Your hair type should determine your heat setting, and you’ll need an iron with variable heat settings in order to control it (so look for that feature at time of purchase). If your hair is fine, fragile or color treated, use a low heat setting — below 200 degrees — to avoid burning or damaging your hair. If you already have curly, coarse or thick hair, you can go higher — between 200-300 degrees, says Moticka. As you curl your hair, notice how it responds to the heat and increase the temperature accordingly. Never go above 400 degrees though, she warns.

Irons to try:

Conair 1-1/4″ Hydro Silk Tourmaline Ceramic Curling Iron, $9.99.
BaByliss PRO GT Gold Titanium Spring Curling Iron, $59.95.
Conair Instant Heat 1″ Curling Iron, $11.99.

Curling tip 3: Prep hair properly for heat styling

you’ve found the iron that best suits your needs, the next crucial step to curling your hair like a pro is preparing your hair for the heat it’s about to endure. Here’s how to do it:
Prep: If your hair is naturally oily and limp, start by washing and conditioning with volumizing products. Then spray damp hair from roots to ends with a thermal heat protectant to prevent damage. Next, apply a strong-hold mousse like Rene Furterer Structuring Mousse, $13.99 on your roots (for a fuller look) or from mid-shaft to ends (for a looser, softer look). Blow dry hair upside down with your hands until hair is completely dry, says Moticka.

Curling tip 4: How to get bouncy curls

Now that you know how to properly prep your hair, here is how Moticka says to get bouncy, tight curls that last (if that’s an issue for you).
Start by dividing and clipping your dry hair into manageable sections. Of course, the more hair you have and the thicker it is, the more sections you’ll need to create. Working from the nape of your neck up first, grab a one-inch section and comb through it. Pick up the section at the ends and mist with a light-hold hairspray to create lift. If your iron is a spring barrel iron (meaning it has a clamp) clamp hair at the ends and roll up until it is completely around the barrel. If you are working with a clamp-less iron, wrap a section around the barrel starting at the roots. Hold hair on the iron for 10-20 seconds. Continue working in sections until your entire head is curled. Finish by gently fingercombing curls and misting entire head with hairspray.
If your hair has a hard time holding a curl, once you release the section from the iron, roll it back up on your fingers and secure with duckbill clip. If you are concerned about creating weird clip marks around your hairline, place a small piece of tissue paper (or toilet paper) between the clip and your hair. Leave hair in clips until your entire head is finished and hair is completely cooled, says Moticka. Then you can release and finger comb.

Curling tip 5: How to get loose, flowing waves

Start by sectioning and clipping dry hair into diagonal sections, which will give hair a softer look, says Moticka. Grab a two-inch section of hair and comb through it. Lift up the section from the ends and mist with light-hold hairspray to create lift. Then carefully wrap the hair in a spiral manner around the barrel of the iron (from roots to the tips), pointing the iron downward toward the floor. Let hair sit on iron for 10-20 seconds, holding the ends tightly around the barrel the entire time. Release hair and mist section lightly with hairspray. Continue until your entire head is curled.
For more glam, softer waves, brush through curls with a natural bristle brush. To get a piece-y, beachy feel, simply shake out the curls with your hands.
Overall, there are many different methods to curling your hair. You can go with curling methods that use heat and curling methods that don’t. However if you do use heat to curl your hair, just keep in mind that too much heat can damage your hair, or if you don’t want to use heat you can wet your hair and use a comb to smoothen it out. It’s also important to put conditioning spray on your hair to ensure that it stays smooth and will curl easily. Finally, it is important that when you curl your hair, make sure each separated part of your hair is equally sized with the curler so that the results are beautiful curls of the same size. You can go with many different hairstyles and curls to created your own look!
Learn more at: http://tinyurl.com/ld24v67 

Monday 16 December 2013

8 Tips for An All Natural Skin Care Routine

all natural skin care
While we’re all about trying the latest face lotions, potions and the like, there’s something to be said about using products on your face that are a bit more Mother Nature-friendly (especially for those of us with super sensitive skin). With that in mind, we chatted with all natural skin care guru and aesthetician Carola May who has over 25 years of experience, as well as her own line of skin care, Dahliana. Carola shared eight easy ways to infuse a little bit of nature into your routine, below.
1. Age gracefully with antioxidants: Start your anti-aging routine in your mid-twenties and consider it “age prevention.” Use powerful topical antioxidants like Resveratrol and Coenzyme Q10 daily under makeup and or at nighttime.
 2.  Toss harsh products: Be sure to shy away from harsh ingredients such as toxic retinols and glycolic acids in your daily skin care routine. They tend to damage your skin, especially if your skin is exposed to the sun, and can irritate sensitive skin.
3.   Wash your face: Always wash your face at nighttime to remove free radicals that your skin accumulates during the day from smog and dirt. Skin restores itself at night and it’s best not to absorb anything but healthy ingredients.
4.  Stay away from parabens: Use skin care products that are natural and organic without parabens. These are the healthier choices for your body: It’s been clearly proven that products containing fillers and chemicals are irritating and can cause breakouts.
5. Eye cream is your BFF: The under eye area works hard—we blink a thousand times a day!—and our under eyes are fragile, requiring extra care with effective, quality products. Try a product with malic acid from apple juice. It’s a mild, very effective exfoliator that helps slough off the dead skin in the delicate eye area.
6.  Read up on what you put on your face: Always educate yourself on ingredients in skin care versus following what you read or see from empty advertising promises. You’ll achieve great results with sound ingredients—not just a pretty jar.
7.  Watch what you put inside your body, too:  Drink plenty of filtered water and eat a healthy diet with loads of fresh fruits and veggies. Cut sugars and carbs for a glowing complexion.
8. Reset your skin with a balancing mask: This mask is calming, hydrating and exfoliating: Combine 1/2 a banana with 1/4 cup of oatmeal and 1 teaspoon of honey. Mix all of the ingredients, apply to the skin and lie down for 15 minutes. Remove with a washcloth and rinse face thoroughly with warm water. Oatmeal calms and moisturizes the skin, while the fruit acids in bananas help slough off dead skin and re-energize the complexion. (Bananas are also high in vitamins C, A, B6 and B12, plus they contain potassium and magnesium).
Image via Istock

Fashion Advice For Busty Women

Having big breasts is not always easy, especially when it comes to dressing them up! Here all the things you need to look out for to look thinner and sexier!

Big breasts are commonly seen as super sexy by men and most women feel really lucky to have them and they are for sure envied by the others.
Those who do not have them don’t have a problem in having them done by their plastic surgeon just to add more sensual curves to their body, especially the Hollywood stars, who are big fans of this practice.
It seems like busty women have it all, but actually, even though sensual curves look stunning on them, they are really hard to dress!
Most women and girls that I know despise their full breasts, not because they think it is unattractive, but because they never know what to wear that will make them look sexy and not vulgar, voluptuous and not fat.
It is a challenge indeed, especially when it comes to choosing the necklines, as if you go for a high one it will make it look like you have a sausage on your chest and make the breasts look much lower, whereas if it is too low it can very easily look vulgar.
Plus, there is the problem that some women are ashamed of their cleavage, as they think it is too big and they risk to attract the wrong attention from men, so they tend to hide it and in doing that they make it look even bigger and the whole figure looks heavier.
Wearing the right clothes for your breast will in fact make you loose pounds faster than a speedy diet and enhance it in all the right ways, without exaggerating.
So, here are the top tips for dressing if you are heavy-chested!

Support those girls

Source
Source (via forum.santabanta.com)
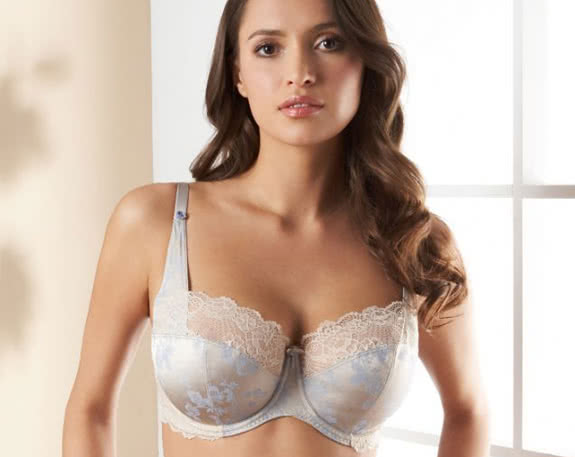
A great outfit starts from an even greater foundation, and that is true especially if you are a busty woman. A rightly fitted and supportive bra can make all the difference in making you look thinner and gorgeous in anything you will wear.
It comes with no surprise that most women actually wear the wrong size bra, even if they have a small cleavage, but especially if they have a big one this fact becomes quite obvious. If you have never done it, I think it is now time to go and get professionally measured and then invest in a great bra that you can use and reuse under anything.
A balconette style bra is the best option as it both lifts the breasts and it gives them a sexy shape. You should always make sure that the back straps are wide and tight, so they will not cut into the soft flesh of your under-arms and back and give enough support to lift the chest.
The shoulder straps too have to be regulated correctly. In order to see if the bra you are trying on is the right one for you, check also that the part that lies between the breasts fits perfectly and is not lifted up.
You should always have different bras to wear with different necklines, so make sure to buy a few models. When it comes to strapless bras then, pay particular attention to them and get one that is really structures and supportive and even if you try to jump up and down or run it will not fall.
The best ones in my opinion, when it comes to strapless bras for busty women, are those ones designed by Wonderbra!
The neckline DOs and DON’Ts

Choosing the right neckline is probably the most important thing for a busty woman as it can really make the difference and flatter your figure like anything else. Here are some things you should look for and some that you should avoid.
DO go for square, scoop and sweetheart necklines that are absolutely great for showing off your cleavage in the right way.
DON’T go for high necklines. This is a big no-no as they will make your breast look much bigger and also lower. Plus they will also give you a uni-boob effect that you want to avoid at all costs. So no both to rounded and turtlenecks.
DO choose v-neck tops and dresses that are great for separating the breasts and also elongate the body. But be careful not to exaggerate as the risk of looking vulgar is always there.
DO go for asymmetric necklines, like one shoulder dresses, as they are very sensual but not excessive.
Source
Source (via fashion.allwomenstalk.com)

The right dresses for you

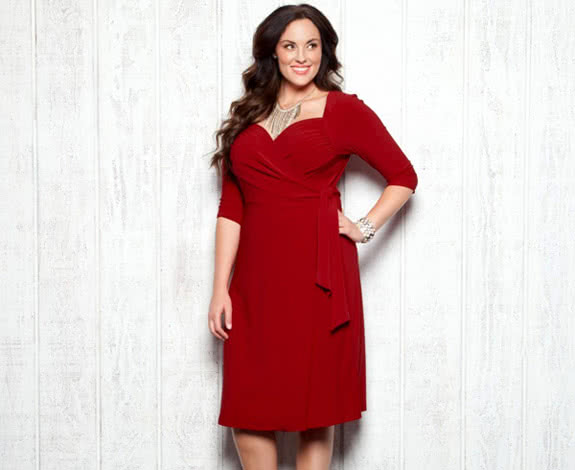
Wrap dresses are your best friends! They are very flattering because they separate the breasts and enhance them, but they also underline the waist making the whole body look slimmer. Empire waist dresses are also great for this same reason.
Try o avoid sleeveless dresses though as they draw the attention to the bust and the upper arms. Three-quarter sleeves are more flattering.

Tops and blouses

Say no to oversize and yes to body-hugging tops. Go for simple styles and avoid elaborate ruffles and frills that will only add bulk.
Corset tops will be perfect to accentuate the bust in a non-vulgar way. Also tops that are tight on the waist and loose on the chest are great as they will give the illusion of a smaller bust.
No to spaghetti straps that will exaggerate the appearance of the bust but choose instead thicker straps that are more supportive.
As for shirts and blouses, make sure that the buttons at the chest don’t pull and don’t seem like they are going to explode at any moment.
Source
Source (via www.celebrityicing.com)

How to accessorize

Your necklaces should never hit at the bustline (the height of the nipples) and also not lower as they will just hang at mid-air. Either choose really long necklaces, at the height of your belly, or chockers.
The best solution for busty women anyhow are earrings, as there is no risk that they will interfere with the neckline. Plus, they also draw the attention away from the bust.
When it comes to handbag, choose medium to large sized ones for more balance and avoid small ones that will simply exaggerate the appearance of the bust.
Loosely drapes scarves are also a great tool for elegantly covering up the chest!
Cover photo: huffpost.com

Fashion Tips for Busy Mums

All too often, mums are so busy they forget to make any time for themselves. In between packing lunchboxes, driving the family 'taxi', keeping on top of the housework and walking the dog, it's no surprise modern mums find little time to devote to style. But, given a few easy tips, it can be simple to go from frumpy to funky and find a casual style that works for your lifestyle and can make you feel great!

Our top tips for a sassy style are:


. Make it Fit
. Comfort First
. Fashionable Lounge Wear
. Black is Always the New Black
. Perfect Parkas
. Exercise Kit
. Skinny Style
. Fuss-free Fabrics
. Beautiful Bags
. Make up in Minutes

Let's run through the tips in more detail:

1. Make it Fit


Even if you are carrying a little more weight than you used to, don't drown yourself in fabric to compensate. This will only make you look bigger than you are, and make you feel like a sack of potatoes. Choose trendy tunics and over sized shirts to hide those bits you aren't confident with, while still maintaining a shape.

2. Comfort First


When it comes to footwear, this is the time of your life when comfort really does come first! Thankfully, with the growing trend for flats and pumps, there are still plenty of stylish and super-comfortable styles around. The ladies' range from Geox shoes includes plenty of flat styles, many of which have air-cushioned soles, perfect for a dash up to school or a whizz round the supermarket.

3. Fashionable Lounge Wear


Italian mums have a reputation for being both stylish and sassy, and not because they wear velour tracksuits and heels to the supermarket. Luckily, you can emulate a less questionable version of Italian fashion by choosing lounge wear that is trendy and comfortable-and forgo the heels for flats instead.

4. Black is Always the New Black


Each new season, fashion has a new "it" colour, but there is one colour-rather, lack of colour-that never goes out of style. A simple black shirt is a wardrobe classic that is effortlessly stylish. Black also is the best colour for obscuring stains, meaning it won't show when your brood starts to play with their food and it ends up on you. For your blacks, it's worth investing in high-quality, durable fabrics that will last a long time.

5. Perfect Parkas


A comfy, neutrally coloured parka is a godsend when it comes to dashing out on the school run. Warm, showerproof and comfortable, a good parka jacket will be the perfect solution to grab and throw over whatever you are wearing as you dash out of the door!

6. Exercise Kit


It doesn't matter whether or not you're going to the gym-having a child is workout enough. As it turns out, sweatpants and a sweatshirt are no longer the exercise gear of choice, and a number of new brands in charge of gym fashion have made form-fitting and comfortable garments popular and affordable. Try yoga pants and exercise tops for your errands.

7. Skinny Style


With all the flat shoes you'll be wearing, boot cut jeans will just make you look shorter and wider - not an attractive proposition! Invest in a couple of good pairs of skinny or straight leg jeans, as these look fantastic with ballet pumps or sandals and will see you right through the year.

8. Fuss-free Fabrics


It goes without saying that, whatever age your kids are, chances are a sticky hand will grace your outfit at least once a day. For this reason, pick fabrics that will be easy to clean and are washing-machine friendly. Jersey material for dresses and tunics is great, as it's quick and easy to wash and dry and also feels fantastic on.

9. Beautiful Bags


Forget those tiny clutches you used to love so much. The life of a busy Mum is all about big Mummy bags and lots of storage space. Embrace the over sized bag requirement, as there are still plenty of options to choose from and lots of stunning styles. Go for something fairly neutral though, so you can grab it whenever you go out, no matter what you are wearing.

10. Make Up in Minutes


No doubt you won't want to spend hours applying layers of fussy make up and products to your skin (even if you did you probably wouldn't have time). Boil it down to the essentials you can't live without and create a quick and easy make-up ritual you can perform with your eyes closed.
The five-minute ritual goes something like this: dab concealer under your eyes to get rid of dark circles. Choose a tinted moisturizer mixed with a touch of foundation to give your skin a healthy glow. Add a slick of brown mascara and a neutral long-lasting lipstick to keep you looking and feeling great all day.

Last but not Least…


... is lingerie. French women spend an estimated 20% of their budget on lingerie; while this may be extreme, having something light and lacy under your layers helps you feel special and sexy, as well as supported. While feeling sexy as a mum may not be your top priority, lingerie can be a needed boost of self-confidence on your off days.


5 Home Frizzy Hair Remedies

Want to save some money? Try some home frizzy hair remedies for keeping the spring in your curls. These remedies can help you have no-frizz curls with items picked up from your local grocery store. Here are our tips to repair dry hair now!

Rinses

Rinsing your hair with something other than your shower water can work wonders!
1. Carbonated water rinse. If you often let your curls air dry, this is a great remedy to eliminate hair frizz caused by humidity. After you wash your hair, give it a final rinse with carbonated or sparkling water. The reason carbonated or sparkling water reduces frizz is because of it's low pH level.Learn more about pH levels and frizz now.
2. Apple Cider Vinegar. This is another great natural remedy that is very effective in preventing frizzy curls. The procedure is very much like the process above with the carbonated/sparkling water. Wash your hair as you normally would and give it a final rinse with equal parts water and apple cider vinegar. Another great benefit of apple cider vinegar is shine! Shiny and frizz-free hair? Sign me up! We've broken down the apple cider vinegar process just for you!
3. Beer. Beer is another great rinse option, and ranks third on our list of unconventional no-frizz tips. Beer replenishes moisture in your hair. Dark beers often provide the most nutrients and moisture. When doing the rinse, simply coat your hair with them and let it sit for a few minutes. When ready, rinse your hair with cold water—which will also help get rid of the smell.

Natural Homemade Conditioners

You can pack the nutrients into your own conditioners. Check out our recipes!
4. Mayonnaise and Avocado Conditioner. Here is a recipe is a very effective natural conditioner for dry, frizzy hair. Mix 1 cup of mayonnaise with 1/2 avocado until you have a paste. Rub it on your hair and cover your head with a plastic cap. Wrap a hot towel around it. Leave it on for 20 minutes and wash. Repeat once a week for better results. Check out more about avocado hair conditioners here.
5. Coconut oil or olive oil. Oil is your frizz-free friend—maybe even your best no-frizz friend. Oils are a great sealer or conditioner. Check out this recipe for oil conditioner: begin by heating up one cup of olive oil or coconut oil in a glass jar. Apply this mixture throughout all of your hair, evenly distributing it. Cover your curly hair with a shower cap and wrap a hot towel around your head to increase moisture absorption. Keep on for around 30 minutes, rewarming your towel as needed (you'll need constant heat). Shampoo and rinse your hair with cold water. Do this three times a week for the best results. Read more about coconut oil for hair here.
Learn more here: http://tinyurl.com/83ul5q9

8 Homemade Hair Treatments

Eggs, yogurt and honey are, at first glance, all components of a tasty breakfast—but they also happen to be hair treatment ingredients, and affordable, all-natural ones at that. And they're not the only ones. Did you know, for instance, that the oils in avocados more closely resemble our own skin's oils than any product in the beauty aisle does? Or that the mild acidity in lemon is an effective—and gentler—alternative to chemical-laden products? Next time your locks need a lift, save money by using one of these kitchen fixes.

For All Hair Types
"The [raw] egg is really the best of all worlds," says Janice Cox, author ofNatural Beauty at Home. The yolk, rich in fats and proteins, is naturally moisturizing, while the white, which contains bacteria-eating enzymes, removes unwanted oils, she explains.
To Use: For normal hair, use the entire egg to condition hair; use egg whites only to treat oily hair; use egg yolks only to moisturize dry, brittle hair, Cox says. Use 1/2 cup of whichever egg mixture is appropriate for you and apply to clean, damp hair. If there isn’t enough egg to coat scalp and hair, use more as needed. Leave on for 20 minutes, rinse with cool water (to prevent egg from “cooking”) and shampoo hair. Whole egg and yolks-only treatments can be applied once a month; whites-only treatment can be applied every two weeks.
Photo by Shutterstock.

For Dull Hair
Styling products (as well as air pollution) can leave a film that both saps moisture and dulls shine—but dairy products like sour cream and plain yogurt can help reverse this damage. "Lactic acid gently strips away dirt while the milk fat moisturizes," says Lisa Belkin, author of The Cosmetics Cookbook.
To Use: Massage 1/2 cup sour cream or plain yogurt into damp hair and let sit for 20 minutes. Rinse with warm water, followed by cool water, then shampoo hair as you normally would. Treatment can be applied every other week.
Photo by Shutterstock.

For Itchy Scalp
undefined
To fight flakes—brought on by poor diet, stress and climate, among other factors—try a lemon juice and olive oil mixture in your hair. "The acidity in lemon juice helps rid your scalp of any loose, dry flakes of skin, while the olive oil moisturizes the [newly exposed] skin on your head," says Cox.
To Use: Mix 2 Tbsp fresh lemon juice, 2 Tbsp olive oil and 2 Tbsp water, and massage into damp scalp. Let mixture sit for 20 minutes, then rinse and shampoo hair. Treatment can be applied every other week.
Photo by Shutterstock.

For Limp or Fine Hair
To add body to hair, reach for an unlikely beauty beverage: beer! The fermented drink contains generous supplies of yeast, which works to plump tired tresses, explains Cox.
To Use: Mix 1/2 cup flat beer (pour beer into a container and let it sit out for a couple of hours to deplete carbonation) with 1 tsp light oil (sunflower or canola) and a raw egg. Apply to clean, damp hair, let sit for 15 minutes, then rinse with cool water. Or add flat beer only to a spray bottle and spritz onto dry hair. "When the liquid evaporates, the remaining protein residue (from the wheat, malt or hops) continues to strengthen and structure hair," says Belkin. Treatments can be applied every other week.
Photo by Shutterstock.

For Dry or Sun-Damaged Hair
Whatever your hair-dehydrating demon—hard water, sun overexposure, your trusty flat iron—nature's sweetener can help. "Honey is a natural humectant, which means it attracts and locks in moisture," says Cox.
To Use: Massage approximately 1/2 cup honey into clean, damp hair, let sit for 20 minutes, then rinse with warm water. You can also add 1 to 2 Tbsp olive oil to loosen the honey for easier application. For extremely sun-damaged hair, trying mixing honey with 1 to 2 Tbsp of a protein-rich ingredient, like avocado or egg yolk, which will help replenish the keratin protein bonds that UV rays attack. Treatment can be applied once a month.
Photo by Shutterstock.

For Oily or Greasy Hair
"Used properly, [cornmeal or cornstarch] is an inexpensive way to remove oil and grease," says Belkin.
To Use: Pour 1 Tbsp cornmeal or cornstarch into an empty salt or pepper shaker and sprinkle onto dry hair and scalp until you’ve used it all. After 10 minutes, use a paddle hairbrush to completely brush it out. Treatment can be applied every other day.
Photo by iStockPhoto.

For Frizzy Hair
Home beauty experts swear by avocado—and not just to repair damaged hair. Its oils (which are light and moist like our own natural skin secretions) and proteins boast the best combination of nutrients for smoothing and weighing down unruly hair, explains Cox.
To Use: Mash up half an avocado and massage into clean, damp hair. Let sit for 15 minutes before rinsing with water. Amp up moisturizing power by combining mashed avocado with 1 to 2 Tbsp of a hydrating ingredient, like sour cream, egg yolks or mayonnaise. Treatment can be applied every two weeks.
Photo by Shutterstock.

For Residue-Ridden Hair
undefined
"Nothing eats through product buildup like baking soda," Cox says. Sodium bicarbonate essentially breaks down anything acidic.
To Use: Mix 1 to 2 Tbsp baking soda with small amounts of water until a thick paste forms. Massage into damp hair and let sit for 15 minutes. Rinse with water, then shampoo hair. Treatment can be applied every two weeks.
Photo by Shutterstock.

Learn more at: http://tinyurl.com/bju5sn7